1. 문제 및 예시


Given two strings S and T, return if they are equal when both are typed into empty text editors. # means a backspace character.


Example 1:
Input: S = "ab#c", T = "ad#c"
Output: true
Explanation: Both S and T become "ac".


Example 2:
Input: S = "ab##", T = "c#d#"
Output: true
Explanation: Both S and T become "".


Example 3:
Input: S = "a##c", T = "#a#c"
Output: true
Explanation: Both S and T become "c".


Example 4:
Input: S = "a#c", T = "b"
Output: false
Explanation: S becomes "c" while T becomes "b".


** 1 <= S.length <= 200
** 1 <= T.length <= 200
** S and T only contain lowercase letters and '#' characters.


2. 풀이


/**
 * @param {string} S
 * @param {string} T
 * @return {boolean}
 */
var backspaceCompare = function(S, T) {
    let newS = [], newT = [];
    for(let c of S){
        if(c === "#") {
            newS.pop();
        }
        else{
            newS.push(c);
        }
    }
    newS = newS.join('');
    for(let c of T){
        if(c === "#") {
            newT.pop();
        }
        else{
            newT.push(c);
        }
    }
    newT = newT.join('');
    return newS === newT;
};


3. 결과


104 / 104 test cases passed.
Status: Accepted
Runtime: 52 ms
Memory Usage: 35.8 MB


반응형


1. 문제 및 예시


Given a non-empty, singly linked list with head node head, return a middle node of linked list. 
If there are two middle nodes, return the second middle node. 
  

Example 1: 
Input: [1,2,3,4,5] 
Output: Node 3 from this list (Serialization: [3,4,5]) 
The returned node has value 3.  (The judge's serialization of this node is [3,4,5]). 
Note that we returned a ListNode object ans, such that: 
ans.val = 3, ans.next.val = 4, ans.next.next.val = 5, and ans.next.next.next = NULL. 


Example 2: 
Input: [1,2,3,4,5,6] 
Output: Node 4 from this list (Serialization: [4,5,6]) 
Since the list has two middle nodes with values 3 and 4, we return the second one. 

** The number of nodes in the given list will be between 1 and 100.


2. 풀이


/**
 * Definition for singly-linked list.
 * function ListNode(val) {
 *     this.val = val;
 *     this.next = null;
 * }
 */
/**
 * @param {ListNode} head
 * @return {ListNode}
 */
var middleNode = function(head) {
    let arr = []
    let trav = function(node){
        arr.push(node);
        if(node.next){
            trav(node.next)
        }
    }
    trav(head);
    return arr[(arr.length %2 === 0) ? arr.length /2 : (arr.length-1) /2]    
};


3. 결과


15 / 15 test cases passed.
Status: Accepted
Runtime: 48 ms
Memory Usage: 33.7 MB


반응형


1. 문제 및 예시


Given an integer array arr, count element x such that x + 1 is also in arr.

If there're duplicates in arr, count them seperately.


Example 1:
Input: arr = [1,2,3]
Output: 2
Explanation: 1 and 2 are counted cause 2 and 3 are in arr.


Example 2:
Input: arr = [1,1,3,3,5,5,7,7]
Output: 0
Explanation: No numbers are counted, cause there's no 2, 4, 6, or 8 in arr.


Example 3:
Input: arr = [1,3,2,3,5,0]
Output: 3
Explanation: 0, 1 and 2 are counted cause 1, 2 and 3 are in arr.


Example 4:
Input: arr = [1,1,2,2]
Output: 2
Explanation: Two 1s are counted cause 2 is in arr.


** 1 <= arr.length <= 1000
** 0 <= arr[i] <= 1000


2. 풀이


/**
 * @param {number[]} arr
 * @return {number}
 */
var countElements = function(arr) {
    let set = [], result = 0;
    for(let elem of arr){
        if(set.indexOf(elem) === -1){
            set.push(elem);
        }
    }
    for(let elem of arr){
        if(set.indexOf(elem +1) !== -1){
            result ++;
        }
    }
    return result;
};


3. 결과


35 / 35 test cases passed.
Status: Accepted
Runtime: 52 ms
Memory Usage: 33.8 MB


반응형


1. 문제 및 예시


Given an array of strings, group anagrams together.


Example:
Input: ["eat", "tea", "tan", "ate", "nat", "bat"],
Output:
[
  ["ate","eat","tea"],
  ["nat","tan"],
  ["bat"]
]


** All inputs will be in lowercase.
** The order of your output does not matter.


2. 풀이


/**
 * @param {string[]} strs
 * @return {string[][]}
 */
var groupAnagrams = function(strs) {
    const mapStrs = new Map();
    for (let i = 0; i < strs.length; i++) {
        let str = strs[i];
        let sortedStr = str.split('').sort().join('');
        if(mapStrs.size > 0 && mapStrs.has(sortedStr)){
            mapStrs.get(sortedStr).push(str);
        }else{
            mapStrs.set(sortedStr,[str])
        }
    }
    let result = [];
    for(let list of mapStrs){
        result.push(list[1]);
    }
    return result;
};

** 단어내 알파벳을 정렬시켜 맵에 담아두고 같은 알파벳을 가진 단어를 찾는다.


3. 결과


101 / 101 test cases passed.
Status: Accepted
Runtime: 240 ms
Memory Usage: 45.2 MB


반응형


1. 문제


Say you have an array for which the ith element is the price of a given stock on day i.

Design an algorithm to find the maximum profit. You may complete as many transactions as you like (i.e., buy one and sell one share of the stock multiple times).

** You may not engage in multiple transactions at the same time (i.e., you must sell the stock before you buy again).


2. 예시


Example 1:
Input: [7,1,5,3,6,4]
Output: 7
Explanation: Buy on day 2 (price = 1) and sell on day 3 (price = 5), profit = 5-1 = 4.
             Then buy on day 4 (price = 3) and sell on day 5 (price = 6), profit = 6-3 = 3.


Example 2:
Input: [1,2,3,4,5]
Output: 4
Explanation: Buy on day 1 (price = 1) and sell on day 5 (price = 5), profit = 5-1 = 4.
             Note that you cannot buy on day 1, buy on day 2 and sell them later, as you are
             engaging multiple transactions at the same time. You must sell before buying again.


Example 3:
Input: [7,6,4,3,1]
Output: 0
Explanation: In this case, no transaction is done, i.e. max profit = 0.


3. 풀이


/**
 * @param {number[]} prices
 * @return {number}
 */
var maxProfit = function(prices) {
    let result = 0, idx = 0;
    let high = prices[0], low = prices[0];
    while(idx < prices.length -1){
        while(idx < prices.length -1 && prices[idx] >= prices[idx +1]){
            idx ++;
        }
        low = prices[idx];
        while(idx < prices.length -1 && prices[idx] <= prices[idx +1]){
            idx ++;
        }
        high = prices[idx];
        result += (high - low);
    }
    return result;
};

** 하락점에서 구매, 상승점에서 판매를 반복한다.


4. 결과


201 / 201 test cases passed.
Status: Accepted
Runtime: 112 ms
Memory Usage: 35.3 MB


반응형


Postgresql과 GraphQL을 연결시켜주는 PostGraphile에 대해 알아봅니다.


1. 소개


GraphQL은 서버 측 데이터와 통신하기 위한 환상적인 솔루션입니다. GraphQL을 통해 개발자는 서버와 상호 작용하는 사람들이 서버에서 필요한 데이터의 정확한 구조를 지정할 수 있도록 하여 데이터의 오버 페치 및 언더 페치 문제를 해결하는 빠르고 안정적인 API를 만들 수 있습니다. 이는 GraphQL을 사용해 애플리케이션을 개발하는 개발자들에게 더 나은 개발자 경험을 제공하며 엔드 유저에게는 더욱 빠른 애플리케이션을 제공하는 것을 의미합니다.


과거에는 PostGraphQL로 알려졌던 PostGraphile은 개발자가 PostgreSQL 데이터베이스에 데이터를 저장하는데 필요한  모든 기능을 갖춘 GraphQL 서버를 신속하게 구성할 수 있도록 해주며 PostgreSQL과 GraphQL 두 기술을 결합하는 데 큰 역할을 합니다. PostGraphile은 데이터베이스 기반(DB-driven) 개발을 활용하여 Postgres 데이터베이스 스키마에서 Graphql 서버를 생성 및 업데이트하여 스키마 변경 사항을 자동으로 감지하고 이 변경사항에 따라 서버를 업데이트합니다.


그들의 말에 따르면 :

PostgreSQL에는 이미 놀라운 인증 및 관계 인프라가 있습니다. 왜 커스텀 API에서 해당 로직을 복제해야 합니까?


PostGraphile은 개발자가 제품에 집중할 수 있도록 성능 및 표준 호환 GraphQL API 계층 생성을 처리합니다. 또한 개발 시간이 크게 단축됩니다.


게다가 PostGraphile은 다양한 방식으로 기능을 확장하는 데 도움이 되는 여러 커뮤니티 개발 플러그인을 갖춘 강력한 플러그인 시스템을 자랑합니다.


이 글에서는 PostGraphile을 사용하여 몇 분 만에 모든 기능을 갖춘 서버를 설치하고 실행할 수 있는 방법을 살펴보겠습니다.


2. PostGraphile의 사용법


PostGraphile은 세 가지 주요 방법으로 사용할 수 있습니다.


PostGraphile CLI: 터미널에서 PostGraphile API를 바로 시작하는 가장 쉽고 빠른 방법입니다. 


미들웨어: postgraphile 패키지에서 가져온 PostGraphile 인스턴스를 NodeJS 서버에 마운트 합니다.


도커: PostGraphile을 도커 이미지로 가져와 CLI 옵션으로 Docker 컨테이너에 전달하여 발생합니다.


이 글에서는 CLI를 사용하는 방법에 대해서 알아보도록 하겠습니다.


3. PostGraphile 시작하기.


PostGraphile을 사용하려면 Node.js v8.6 이상을 설치해야 합니다. 아직 설치하지 않은 경우 Node 웹 사이트에서 원하는 버전을 찾아 설치하시기 바랍니다.


PostgreSQL v9.6.0 이상 버전이 필요합니다. PostgreSQL 다운로드 페이지에서 찾을 수 있습니다.


3.1. DB 설치하기.


이 글에선 별도로 Postgresql DB를 설치하는 방법에 대해 다루지 않습니다. PostgreSql을 설치하는 방법은 다음 글에서 확인해 주시기 바랍니다.


3.2. PostGraphile 설치하기.


다음 명령어로 npm을 통해 PostGraphile을 설치합니다.


> npm i postgraphile


3.3 Express와 연동하기.


이제 실제 Express서버에 Postgraphile을 연동해 봅시다.


const express = require("express");
const { postgraphile } = require("postgraphile");
const vals = require('./const');
const app = express();

const connectionString = `postgres://${vals.user}:${vals.pass}@${vals.host}:${vals.port}/${vals.db}`

app.use(
  postgraphile(
    process.env.DATABASE_URL || connectionString,
    "public",
    {
      watchPg: true,
      graphiql: true,
      enhanceGraphiql: true,
    }
  )
);

app.listen(process.env.PORT || 3300);


** connectionString에 필요한 변수는 const.js에 별도로 정의해 사용하고 있습니다.


3.4 Graphiql로 직접 데이터 조회해보기.


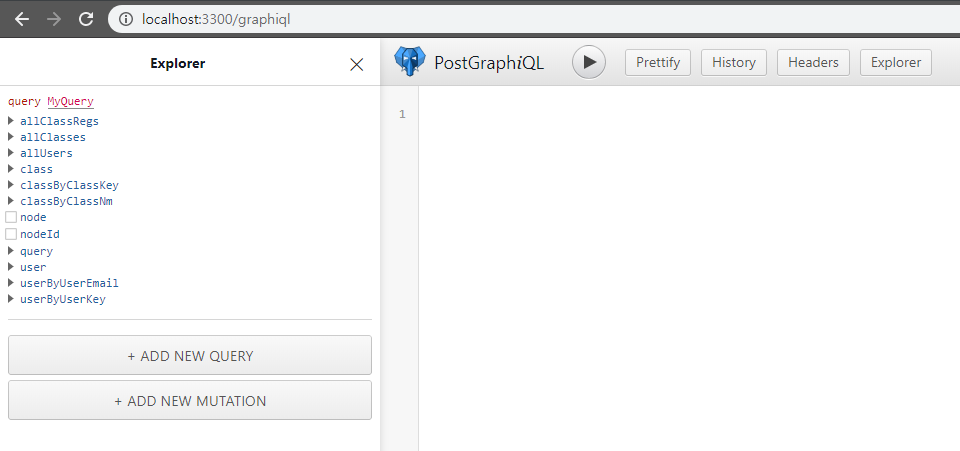
위의 코드를 실행시키고 graphiql 페이지로 이동한 뒤 Explorer 버튼을 눌러봅시다.


좌측에 우리가 만들지 않은 여러 옵션이 보이시나요?


우리는 직접 리졸버를 만들지 않았습니다만 이미 우리가 만들었던 테이블을 쿼리 할 수 있는 옵션이 존재합니다. Postgraphile에서 알아서 해줍니다!


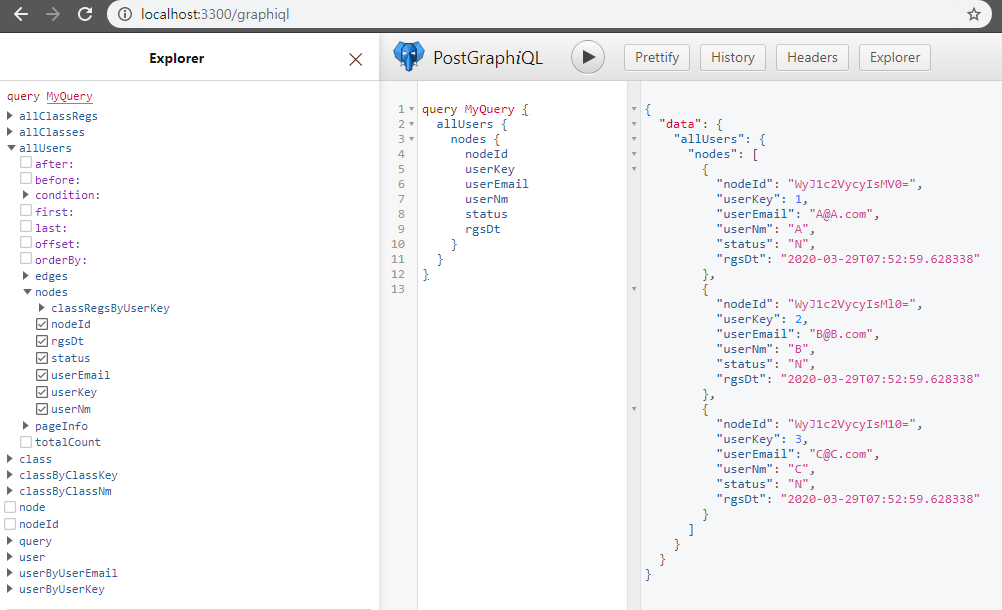
이제 미리 만들어둔 users 테이블의 모든 데이터를 조회해 봅시다. 직접 타자 칠 필요 없이 익스플로러에서 클릭만으로 쿼리를 만들 수 있습니다.


단지 allUsers->nodes를 클릭한 후 컬럼을 순서에 맞게 클릭했을 뿐입니다. 여기서 nodeId라는 것이 보일 텐데 이 id는 postgraphile내에서 node마다 유지되는 고유한 ID입니다. 


4. 마무리


이렇듯 postgraphile을 사용하면 별도의 추가 작업 없이 postgresql에 연결해주는 것만으로도 바로 graphql을 사용할 수 있습니다. 다음에는 직접 클라이언트에서 호출해 사용하는 방법에 대해 알아보도록 하겠습니다.


반응형


1. 문제


Given an integer array nums, find the contiguous subarray (containing at least one number) which has the largest sum and return its sum.


2. 예시


Input: [-2,1,-3,4,-1,2,1,-5,4],
Output: 6
Explanation: [4,-1,2,1] has the largest sum = 6.


3. 풀이


/**
 * @param {number[]} nums
 * @return {number}
 */
var maxSubArray = function(nums) {
    let curSum = nums[0];
    let maxSum = nums[0];
    
    for(let i = 1; i < nums.length; i++) {
    	curSum = Math.max(nums[i], curSum + nums[i]);
        if(curSum > maxSum) {
        	maxSum = curSum;
        }
    }
    
    return maxSum;
};


4. 결과


202 / 202 test cases passed.
Status: Accepted
Runtime: 52 ms
Memory Usage: 35.1 MB


5. 참고


Dynamic Programming, 카데인 알고리즘을 이용한다. 

자세한 내용은 이 글을 참고하세요.


반응형

카데인 알고리즘에 대해 알아봅니다.


1. 앞선 글


널리 알려진 알고리즘 문제 중에 "Maximum Subarray"라는 문제가 있습니다. 간단히 설명하자면 주어진 배열에서 연속되는 숫자의 합 중 가장 큰 합을 구하는 문제입니다.


보통 이 문제를 해결하면서 가장 먼저 시도하는 방법은 모든 경우의 수를 다 구해보는 Brute Force일 겁니다. 문제는 배열의 수가 커지면 커질수록 이 방법은 Timeout이 발생할 확률이 매우 높아진다는 것입니다.


이제 다음으로 드는 생각은 DynamicProgramming을 이용해보자 일 겁니다. 보통 이런 Maximum Subarray와 관련된 문제는 연관 테마가 DynamicProgramming이기도 하니까요. 이때 적용되는 알고리즘이 바로 카데인 알고리즘입니다.


2. 카데인 알고리즘


우선 모든 경우의 수를 다 계산하는 Brute Force 접근법을 생각해 봅시다. 단, 이번에는 거꾸로 한번 생각해보도록 합니다. 즉, 배열 A의 크기가 n이라 할 때 A[0]이 아닌 A[n-1]부터 말이죠.


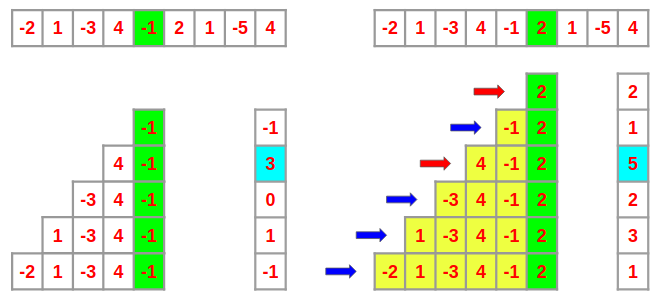
아래 그림과 같이 마지막부터 시작하여 A[n-1]로 끝나는 가능한 모든 배열의 합을 계산합니다. 그런 다음 A [n-2], A [n-3] 등으로 끝나는 가능한 모든 하위 배열의 합을 A[0]까지 계산합니다.


이제 하나를 직접 찍어서 생각해 봅시다. 아래 그림에 표시된 A[4](=-1) 및 A[5](=2)로 끝나는 배열에 초점을 맞추겠습니다.


위 그림에서 A[4]로 끝나는 배열의 최대 합은 [4, -1]의 합인 3입니다. 이제 A[5]로 끝나는 배열을 살펴 봅시다. A[5]로 끝나는 배열은 노란색으로 강조된 A[4]로 끝나는 배열과 녹색으로 강조된 단일값 A[5]로 구성됨을 확인할 수 있습니다.


이제 우리는 A[4]로 끝나는 배열의 합을 알고 있다면 A[5]로 끝나는 배열의 합을 구하기 위해 모든 값을 다시 계산할 필요가 없다는 것을 알게 되었습니다. 이것이 카데인 알고리즘의 원리입니다.


즉 카데인 알고리즘을 한 문장으로 표현하자면 다음과 같습니다.


배열 A에서 인덱스 i까지의 최대 합은 인덱스 i-1까지의 최대 합과 A[i]의 값을 더한 값입니다. 

MaxSum[i] = Max( A[i], A[i] + MaxSum[i-1] )


이런 식으로 모든 인덱스 i에서의 값을 구하는 것은 A[i]와 A[i] + [i-1]까지의 최대 합인 두 숫자를 찾는 것으로 줄일 수 있습니다. 그러므로 재귀 함수를 사용한다면 간단히 해결할 수 있으며 Brute Force 보다 훨씬 낫습니다. 실제로 카데인 알고리즘의 시간 복잡도는 O(n)입니다.


3. 코드에 적용: JavaScript


위의 내용을 직접 코드에 반영해본다면 다음과 같이 나타낼 수 있습니다.


/**
 * @param {number[]} nums
 * @return {number}
 */
var maxSubArray = function(nums) {
    let curSum = nums[0];
    let maxSum = nums[0];
    
    for(let i = 1; i < nums.length; i++) {
    	curSum = Math.max(nums[i], curSum + nums[i]);
        if(curSum > maxSum) {
        	maxSum = curSum;
        }
    }
    
    return maxSum;
};


References

Kadane’s Algorithm — (Dynamic Programming) — How and Why does it Work?

반응형


Express 서버에서 Graphql을 사용하는 방법에 대해 알아봅니다.


1. express-graphql 설치


이 글에서는 express 서버에서 graphql을 사용하는 방법에 대해 알아보기로 했습니다. GraphQL을 따로 사용할 수도 있지만 이 경우에 어울리는 패키지가 이미 존재합니다. 


다음 명령어를 통해 Graphql과 espress-graphql을 설치합니다.


> npm install graphql express-graphql express


이제 다음과 같이 코딩한 뒤 직접 접속해 봅시다.


const express = require('express');
const graphqlHTTP = require('express-graphql');
const app = express();

app.use('/graphql', graphqlHTTP({
    schema: MyGraphQLSchema,
    graphiql: true
}));

app.get('/', function(req, res){
    res.send('Hello Express!');
});

app.listen(3300, function(){
    console.log("Express server is listening on port 3300.");
});


접속이 되시나요? MyGraphQLSchema 때문에 실행이 안된다면 정상입니다. express-graphql 공식 가이드에 따르면 schema 항목에 대해 다음과 같은 설명이 있습니다.


schema: A GraphQLSchema instance from GraphQL.js. A schema must be provided.


이제 진짜 스키마를 제공하기 위해 직접 작성해 봅시다.


2. Schema 작성 및 사용.


이제 GraphQL의 buildSchema를 사용해 스키마를 만들고 사용해 보도록 하겠습니다.


다음과 같이 코드를 수정합니다.


const express = require('express');
const graphqlHTTP = require('express-graphql');
const { graphql, buildSchema } = require('graphql');
const app = express();

var mySchema = buildSchema(`
  type Query {
    hello: String
  }
`);

app.use('/graphql', graphqlHTTP({
    schema: mySchema,
    graphiql: true,
}));

app.get('/', function(req, res){
    res.send('Hello Express!');
});

app.listen(3300, function(){
    console.log("Express server is listening on port 3300.");
});


이제 실행이 되시나요? graphiql 페이지로 이동한 후 직접 쿼리를 날려봅시다


슬프게도 null이 리턴됩니다. 아직 우리의 작업이 다 끝나지 않았다는 말이죠. 생각해 봅시다. 우리가 지금까지 hello에 어떤 값을 리턴해줘라 라는 코드를 작성한 적이 있나요?


이제 hello가 어떤 값을 리턴해야 하는지에 대한 코드를 작성해 보겠습니다. 겸사겸시 다른 스키마도 정의해서 수정해 보도록 합시다.


const express = require('express');
const graphqlHTTP = require('express-graphql');
const { graphql, buildSchema } = require('graphql');
const app = express();

var mySchema = buildSchema(`
  type Query {
    hello: String
    users: [User]
  }
  type User{
    email: String
    name: String
  }
`);

var root = { 
    hello: () => 'Hello world!',
    users: () => { 
        return [
            {email: 'A@A.com', name: 'A'},
            {email: 'B@B.com', name: 'B'},
            {email: 'C@C.com', name: 'C'},
        ];
    },
};

app.use('/graphql', graphqlHTTP({
    schema: mySchema,
    graphiql: true,
    rootValue: root,
}));

app.get('/', function(req, res){
    res.send('Hello Express!');
});

app.listen(3300, function(){
    console.log("Express server is listening on port 3300.");
});


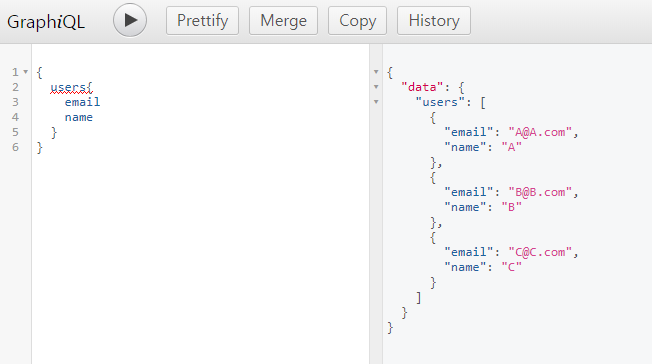
이제 다시 Graphiql로 이동해 다음 쿼리를 수행해 봅시다.


정상적으로 데이터가 출력되는 것을 확인 할 수 있습니다.


반응형

'Programming > JavaScript' 카테고리의 다른 글

Express를 이용한 서버 클러스터 구성.  (1) 2020.06.18
Storybook  (0) 2020.06.02
NodeJs - PostgreSql 연동하기.  (0) 2020.04.04
[React] 불변성 관리 - Immer  (0) 2019.12.30
[Redux] Redux란?  (0) 2019.10.04


Express 서버와 pg 패키지를 이용해 PostgreSql 커넥터를 만들고 DB에서 데이터를 가져옵니다.


0. Postgre DB 준비.


코딩에 앞서 먼저 DB를 준비합니다. 이 글에서 별도로 Postgre DB를 설치하는 방법에 대해 작성하진 않습니다.


다음 글을 참조하셔서 미리 DB를 준비해 주시기 바랍니다.


1. Express서버 준비.


express 패키지를 설치 한 뒤 다음과 같이 코딩해 express서버를 준비합니다.


> npm intall express


var express = require('express');
var app = express();

app.get('/', function(req, res){
    res.send('Hello World!');
});

app.listen(3300, function(){
    console.log("Express server is listening on port 3300.");
});


2. PostgreSql 커넥터 작성.


pg 패키지를 설치한 뒤 다음과 같이 코딩해 Postgresql 커넥터를 준비합니다.


> npm install pg


const vals =  require('./const.js');
const { Pool, Client } = require('pg');

const client = new Client({
    user: vals.user, password: vals.pass,
    host: vals.host, port: vals.port,
    database: vals.db
});

function GetUserList() {
    client.connect();
    client.query('SELECT * FROM users', (err, res) => {
        console.log(res);
        client.end();
    });
};
 
module.exports = {
    getUserList: GetUserList
}


** const.js에는 DB 접속에 필요한 정보가 담겨있습니다.

** 별도의 js 파일이 아닌 해당 값을 직접 user, password, hose, port, databse에 넣어주셔도 됩니다.


3. Express에서 커넥터 호출하기


작성한 커넥터를 호출하기 위해 Express의 코드를 수정합니다.


var express = require('express');
var app = express();

var pgDBConn = require('./pgDBConn.js');

pgDBConn.getUserList();

app.get('/', function(req, res){
    res.send('Hello World!');
});

app.listen(3300, function(){
    console.log("Express server is listening on port 3300.");
});


이제 Express 서버를 실행시키면 콘솔 창에 정상적으로 데이터를 가져오는 것을 확인할 수 있습니다.


반응형

'Programming > JavaScript' 카테고리의 다른 글

Storybook  (0) 2020.06.02
Express에서 GraphQL 사용하기: express-graphql  (0) 2020.04.04
[React] 불변성 관리 - Immer  (0) 2019.12.30
[Redux] Redux란?  (0) 2019.10.04
[jqGrid] 컬럼 순서 변경시 오류가 날 경우  (0) 2019.08.23

+ Recent posts