파이썬을 이용해 RabbitMQ에 메시지를 생성하고 소비하는 방법을 알아봅니다.


1. 사전준비


RabbitMQ를 미리 준비해 둡니다. 로컬에 설치하든 따로 서버를 준비해 설치하든 상관없습니다.


설치 가이드는 다음 글을 참고해 주세요.


2. RabbitMQ 설정


초기 RabbitMQ를 설치하고 나면 vhost와 사용할 queue를 생성해야 합니다.


먼저 vhost를 생성합니다. 로그인 후 Admin > Virtual Hosts로 이동합니다.


Add new virtual host에서 적당한 이름을 입력 한 후 vhost를 생성합니다.


위와 같이 새로운 vhost가 생성된 것을 확인할 수 있습니다. 유저를 보니 아직 vhost에 유저가 하나도 없네요. 생성된 vhost를 클릭해 유저를 할당해 봅시다.


적당한 유저를 고르고 Set permission을 눌러 권한을 부여합니다. 


이제 queue 탭으로 이동해 새로운 큐를 생성합니다.


적당한 이름의 queue를 생성해 줍니다. 이 예제에서는 default exchange를 사용할 예정이므로 별도의 exchange는 생성하지 않습니다.


3. PIKA


파이썬으로 AMQP를 이용하기 위해 PIKA를 사용합니다. 


Pika는 AMQP 0-9-1 프로토콜의 순수한 Python 구현체로써 기본 네트워크 지원 라이브러리와 독립적으로 유지됩니다.


자세한 내용은 여기서 확인하시기 바랍니다.


4. Publisher 구현


virtualenv를 통해 가상 환경을 생성 한 후 pika를 설치합니다.


> pip install pika


그리고 publisher.py 파일을 생성해 다음과 같이 코딩합니다.


import pika

class Publisher:
    def __init__(self):
        self.__url = 'host or ip here'
        self.__port = 5672
        self.__vhost = 'mq_test'
        self.__cred = pika.PlainCredentials('id here', 'password here')
        self.__queue = 't_msg_q';
        return

    def main(self):
        conn = pika.BlockingConnection(pika.ConnectionParameters(self.__url, self.__port, self.__vhost, self.__cred))
        chan = conn.channel()
        chan.basic_publish(
            exchange = '',
            routing_key = self.__queue,
            body = 'Hello RabbitMQ'
        )
        conn.close()
        return

publisher = Publisher()
publisher.main()


init에서 필요한 변수를 미리 지정해 둡니다. '만약 로컬에 기본값으로 설치했다면 url에 localhost, port에 5672를 사용하면 됩니다. vhost와 queue는 앞에서 생성 한 대로 입력했습니다. cred는 vhost 액세스 권한이 부여된 계정을 입력하면 됩니다.


코드 내용은 단순합니다. BlockingConnection을 이용해 커넥션을 생성합니다. chan에 생성된 연결에서 채널을 가져 온 후 basic_publish를 이용해 메시지를 발행합니다. 


exchange에 빈값을 넣어 default exchange를 사용하도록 하였으며 routing_key에 타겟 큐 이름을 넣었습니다. body엔 메시지 내용을 입력하면 됩니다.


이렇게 한번 실행하면 t_msg_q에 Hello RabbitMQ라는 메시지가 한번 생성되고 종료하는 publisher를 만들었습니다.


실제로 MQ 관리자 페이지에서 queue를 눌러보면 메시지가 들어온 것을 확인할 수 있습니다.


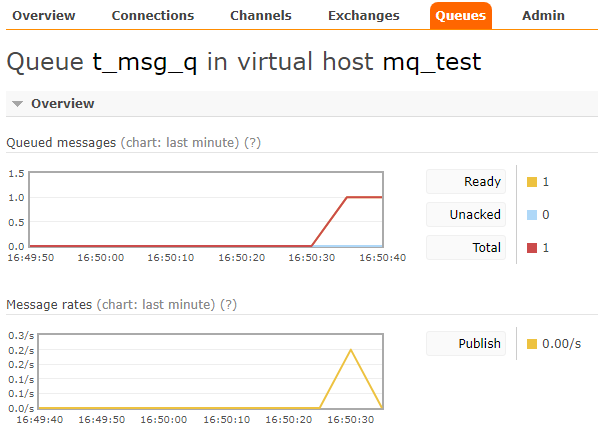
더 아래의 Get messages에서 실제 메시지를 조회 해 볼 수도 있습니다.


5. Consumer 구현


이제 메시지를 발행했으니 소비자를 구현해 보도록 하겠습니다.


별도의 폴더에서 virtualenv를 통해 가상 환경을 생성한 후 pika를 설치합니다.


> pip install pika


그 후 consumer.py 파일을 만들어 다음과 같이 코딩합니다.


import pika

class Consumer:
    def __init__(self):
        self.__url = 'host or ip here'
        self.__port = 5672
        self.__vhost = 'mq_test'
        self.__cred = pika.PlainCredentials('id here', 'password here')
        self.__queue = 't_msg_q';
        return

    def on_message(channel, method_frame, header_frame, body):
        print('Received %s' % body)
        return

    def main(self):
        conn = pika.BlockingConnection(pika.ConnectionParameters(self.__url, self.__port, self.__vhost, self.__cred))
        chan = conn.channel()
        chan.basic_consume(
            queue = self.__queue, 
            on_message_callback = Consumer.on_message,
            auto_ack = True
        )
        print('Consumer is starting...')
        chan.start_consuming()
        return

consumer = Consumer()
consumer.main()


publisher와 다른점만 설명하겠습니다. 


on_message는 메시지를 수신했을 때 실행 될 콜백 함수입니다. 이 예제에서는 단순히 받은 메시지를 출력하는 역할을 하고있습니다.


채널까지 생성한 후 basic_consume를 통해 메시지를 소비하는 방법을 정의합니다. queue엔 앞서 생성한 큐의 이름을 넣어주면 되고 on_message_callback에는 앞에서 정의한 콜백 함수를 넣어줍니다. auto_ack는 메시지를 소비했을 때 자동으로 ack을 날릴지 여부입니다. ack을 mq에 전송하면 소비된 메시지는 제거됩니다.


그 후 start_consuming()을 실행하면 지속적으로 큐에 있는 메시지를 소비하는 상태가 됩니다. 중단하고 싶으면 Ctrl + C를 눌러 중단하면 됩니다.


이제 파이썬을 실행시키면 다음과 같이 메시지가 출력됩니다.


아까 발행한 메시지를 정상적으로 소비하였습니다. 관리자 페이지로 이동해 보면 auto_ack 옵션에 따라 전송된 ack에 의해 메시지가 삭제된 것을 확인할 수 있습니다.


반응형


Python의 BeautifulSoup를 사용해 만든 크롤러를 개선해봅니다.


1. 사전 준비


본 연습 프로젝트는 레드 마인의 이슈를 크롤링 해오는 것을 목표로 합니다.

크롤링을 목표로 하기 때문에 레드 마인의 API는 사용하지 않습니다.


이전 코드는 다음 글을 확인해 주세요.


2. 시그널 처리기 추가하기.


현재의 소스는 한번 크롤링해오고 종료되는 방식입니다. 이제 이 크롤러가 주기적으로 동작하도록 수정해 봅시다.


소스코드의 내용을 다음과 같이 수정해 주세요.


import requests
import datetime
import time
from bs4 import BeautifulSoup

class Crawler:
    def __init__(self):
        self.__main_url = 'https://src.smoh.kr/'
        self.__login_url = 'https://src.smoh.kr/login'
        self.__search_url = 'https://src.smoh.kr/projects/crawlerissues/issues?set_filter=1'
        self.__login_data = {
            'username': 'jd_user',
            'password': 'P@ssword'
        }
        self.__issues = {}
        self.__stop = False;
        return

    def main(self):
        while not self.__stop:
            with requests.Session() as s:
                main_req = s.get(self.__main_url)
                html = main_req.text
                obj = BeautifulSoup(html, 'html.parser')
                auth_token = obj.find('input', {'name': 'authenticity_token'})['value']
                self.__login_data = {**self.__login_data, **{'authenticity_token': auth_token}}

                login_req = s.post(self.__login_url, self.__login_data)
                if login_req.status_code == 200:
                    search_req = s.get(self.__search_url)
                    search_obj = BeautifulSoup(search_req.text, 'html.parser')
                    thead = search_obj.select('div.autoscroll > table > thead > tr > th')
                    tbody = search_obj.select('div.autoscroll > table > tbody > tr > td')
                    issue_obj = {}
                    issue_list = []
                    for i in range(1, len(tbody) +1):
                        if(i % len(thead) != 0):
                            issue_obj[thead[i % len(thead)].text] = tbody[i].text
                        else:
                            issue_list.append(issue_obj)
                            issue_obj = {}
                    self.__issues = {
                        'execution_dttm': str(datetime.datetime.now().isoformat()),
                        'issues': issue_list
                    }
                else:
                    print('Failed to login(Code: %d)' %(req.status_code))
                print(self.__issues)
                time.sleep(5)
        return

crawler = Crawler()
crawler.main()


별로 변경된 내용은 없습니다. init에 __stop을 추가해주고 해당 값이 False이면 크롤링 작업을 5초마다 반복합니다.


중지하고 싶을 땐 Ctrl + C를 눌러서 중지합니다.


종료 방법도 Ctrl + C 밖에 없을뿐더러 종료 시 위와 같은 이상한 에러가 발생합니다. 


시그널을 처리할 수 있도록 수정하여 깔끔하게 종료될 수 있도록 수정해 봅니다.


import requests
import datetime
import time
import signal
from bs4 import BeautifulSoup

class Crawler:
    def __init__(self):
        self.__main_url = 'https://src.smoh.kr/'
        self.__login_url = 'https://src.smoh.kr/login'
        self.__search_url = 'https://src.smoh.kr/projects/crawlerissues/issues?set_filter=1'
        self.__login_data = {
            'username': 'jd_user',
            'password': 'P@ssword'
        }
        self.__issues = {}
        self.__stop = False;

        signal.signal(signal.SIGINT, self.stop)
        signal.signal(signal.SIGTERM, self.stop)
        return

    def stop(self, signum, frame):
        self.__stop = True
        return

    def main(self):
        while not self.__stop:
            with requests.Session() as s:
                main_req = s.get(self.__main_url)
                html = main_req.text
                obj = BeautifulSoup(html, 'html.parser')
                auth_token = obj.find('input', {'name': 'authenticity_token'})['value']
                self.__login_data = {**self.__login_data, **{'authenticity_token': auth_token}}

                login_req = s.post(self.__login_url, self.__login_data)
                if login_req.status_code == 200:
                    search_req = s.get(self.__search_url)
                    search_obj = BeautifulSoup(search_req.text, 'html.parser')
                    thead = search_obj.select('div.autoscroll > table > thead > tr > th')
                    tbody = search_obj.select('div.autoscroll > table > tbody > tr > td')
                    issue_obj = {}
                    issue_list = []
                    for i in range(1, len(tbody) +1):
                        if(i % len(thead) != 0):
                            issue_obj[thead[i % len(thead)].text] = tbody[i].text
                        else:
                            issue_list.append(issue_obj)
                            issue_obj = {}
                    self.__issues = {
                        'execution_dttm': str(datetime.datetime.now().isoformat()),
                        'issues': issue_list
                    }
                else:
                    print('Failed to login(Code: %d)' %(req.status_code))
                print(self.__issues)
                time.sleep(5)
        return

crawler = Crawler()
crawler.main()


init에 signal을 추가했으며 __stop를 다루는 stop함수를 추가했습니다. 이제 Ctrl + C로 종료를 해도 에러 없이 종료되는 모습을 확인할 수 있습니다.


3. Logger 추가하기.


크롤러의 작업 내용을 기록하는 로거를 만들어 적용해 보도록 하겠습니다.


logger.py 파일을 새로 만든 후 다음과 같이 코딩해 주세요.


import logging
import time
import json
import datetime
import os

class Logger:
    def __init__(self, name, log_file):
        self.name = name
        self.log_file = log_file
        logging.basicConfig(level = logging.INFO, format = '%(message)s')
        self.logger = logging.getLogger(self.name)
        self.log_hadler = logging.FileHandler(self.log_file)
        self.logger.addHandler(self.log_hadler)
        return
    
    def log(self, event, value):
        log_obj = {
            'component': self.name,
            'dttm': str(datetime.datetime.now().isoformat()),
            'log': {
                'event': event,
                'desc': value
            }
        }
        self.logger.info(json.dumps(log_obj))
        return


로거는 컴포넌트 이름과 파일 경로를 받아와서 로그 파일을 남깁니다. 남겨지는 로그의 구조는 log_obj에 정의되어 있습니다.


현재는 info레벨의 로그만 남기도록 되어 있으므로 필요에 따라 수정해서 남기면 됩니다.


이제 로거를 사용해 보도록 합니다. crawler.py 파일을 다음과 같이 수정합니다.


import requests
import datetime
import time
import signal
import os
from bs4 import BeautifulSoup
from logger import Logger

class Crawler:
    def __init__(self):
        self.__main_url = 'https://src.smoh.kr/'
        self.__login_url = 'https://src.smoh.kr/login'
        self.__search_url = 'https://src.smoh.kr/projects/crawlerissues/issues?set_filter=1'
        self.__login_data = {
            'username': 'jd_user',
            'password': 'P@ssword'
        }
        self.__issues = {}
        self.__stop = False;
        self.__log_file = 'D:\\crawler.log'

        self.logger = Logger('crawler', self.__log_file)

        signal.signal(signal.SIGINT, self.stop)
        signal.signal(signal.SIGTERM, self.stop)
        return

    def stop(self, signum, frame):
        self.__stop = True
        return

    def main(self):
        self.logger.log('start', { 'pid': os.getpid() })
        while not self.__stop:
            with requests.Session() as s:
                main_req = s.get(self.__main_url)
                html = main_req.text
                obj = BeautifulSoup(html, 'html.parser')
                auth_token = obj.find('input', {'name': 'authenticity_token'})['value']
                self.__login_data = {**self.__login_data, **{'authenticity_token': auth_token}}

                login_req = s.post(self.__login_url, self.__login_data)
                if login_req.status_code == 200:
                    search_req = s.get(self.__search_url)
                    search_obj = BeautifulSoup(search_req.text, 'html.parser')
                    thead = search_obj.select('div.autoscroll > table > thead > tr > th')
                    tbody = search_obj.select('div.autoscroll > table > tbody > tr > td')
                    issue_obj = {}
                    issue_list = []
                    for i in range(1, len(tbody) +1):
                        if(i % len(thead) != 0):
                            issue_obj[thead[i % len(thead)].text] = tbody[i].text
                        else:
                            issue_list.append(issue_obj)
                            issue_obj = {}
                    self.__issues = {
                        'execution_dttm': str(datetime.datetime.now().isoformat()),
                        'issues': issue_list
                    }
                else:
                    self.logger.log('login_fail', { 
                        'pid': os.getpid(), 
                        'error_code':  req.status_code
                    })
                self.logger.log('get_issues', { 
                    'pid': os.getpid(),
                    'count': len(issue_list)
                })
                print(self.__issues)
                time.sleep(5)
        self.logger.log('stop', { 'pid': os.getpid() })
        return

crawler = Crawler()
crawler.main()


이제 코드를 실행시키면 로그 파일 경로에 다음과 같이 정상적으로 로그가 남는 것을 확인할 수 있습니다.


{"component": "crawler", "dttm": "2020-02-03T10:45:16.780440", "log": {"event": "start", "desc": {"pid": 30568}}}
{"component": "crawler", "dttm": "2020-02-03T10:45:17.729584", "log": {"event": "get_issues", "desc": {"pid": 30568, "count": 3}}}
{"component": "crawler", "dttm": "2020-02-03T10:45:23.683570", "log": {"event": "get_issues", "desc": {"pid": 30568, "count": 3}}}
{"component": "crawler", "dttm": "2020-02-03T10:45:28.705034", "log": {"event": "stop", "desc": {"pid": 30568}}}


반응형


Python의 BeautifulSoup를 사용해 크롤러를 만들어 봅니다.


1. 사전 준비


본 연습 프로젝트는 레드마인의 이슈를 크롤링 해오는것을 목표로 합니다.


레드마인 준비는 별도로 설명하지 않습니다. 


** 언제까지 올라가 있을지는 장담할 수 없으나 본문에 제 레드마인 조회용 계정을 사용하셔도 됩니다.


별도의 파이썬 설치방법은 설명하지 않습니다. 다만 원활한 개발을 위해 VirtualEnv만 설명합니다.


파이썬을 설치하고 VSCode로 프로젝트 폴더를 엽니다.


Ctlr + `를 눌러 터미널 창을 열고 다음 명령어로 VirtualEvn를 설치합니다.


> pip install virtualenv


이제 다음 명령어를 통해 VirtualEnv를 활성화시킵니다.


> virtualenv venv


다음과 같이 프로젝트 폴더에 venv 폴더가 생성된 것을 확인할 수 있습니다.


다른 폴더의 이름을 원하시면 venv대신 다른 이름을 지정하시면 됩니다.


이제 virtualenv를 활성화시킵시다. ".\venv\scripts\activate" 파일을 실행시키면 됩니다.


>.\venv\scripts\activate


이제 터미널 앞에 가상 환경으로 정의한 (venv)가 나타난 것을 확인할 수 있습니다.


작업을 종료하고 싶으시면 ".\venv\scripts\deactivate"를 입력하시면 됩니다.


2. BeautifulSoup 이용하기


BeautifulSoup는 Python 패키지중 하나로 HTML 태그를 Python 객체로 만들어줍니다.


문서는 다음과 같이 설명하고 있습니다.


"Beautiful Soup transforms a complex HTML document into a complex tree of Python objects."
"BeautifulSoup는 HTML document안에 있는 수많은 HTML 태그들을 사용하기 편한 Python 객체 형태로 만들어 줍니다."


이 외에도 파싱을 돕는 다양한 내장 함수가 있어 편하게 원하는 데이터를 추출해 올 수 있습니다.


이제 터미널에서 다음 명령어를 실행해 beautisulsoup를 설치합시다.


> pip install beautifulsoup4 


이 외에도 requests라는 패키지가 필요합니다. 이 패키지는 입력한 URL에 대해 반환받는 HTML을 가져오는 역할을 합니다. 다음 명령어를 실행해 requests를 설치합니다.


>pip install requests


이제 이 패키지들을 사용해 보겠습니다. crawler.py 파일을 만든 뒤 다음과 같이 코딩합니다.


import requests
from bs4 import BeautifulSoup

class Crawler:
    def __init__(self):
        self.__url = 'https://src.smoh.kr/projects/crawlerissues/issues'
        return

    def main(self):
        response = requests.get(self.__url)
        if response.status_code == 200:
            obj = BeautifulSoup(response.content, 'html.parser')
            print(obj.html)
        else:
            print('Failed(Code: %d)' %(response.status_code))
        return

crawler = Crawler()
crawler.main()


지정한 URL로부터 응답을 받고 코드가 200 성공인 경우 내용을 BeautifulSoup을 이용해 객체로 생성한 뒤 html을 출력하는 코드입니다.


HTML결괏값이 제대로 보이시나요?


3. 이슈 크롤링하기


이 URL 정보는 CrawlerIssues 프로젝트에 생성된 이슈를 보여주는 URL입니다만 우리가 원하는 이슈 정보를 보려고 하기엔 권한이 부족합니다. HTML 결과를 살펴보면 로그인을 하는 화면임을 확인할 수 있습니다.


실제 URL로 들어가서 개발자 도구(F12)를 연 뒤 Elements 탭에서 확인해 보겠습니다.


이제 우리는 "username"에 유저 ID를, "password"에 암호를 넣고 "login" 액션을 통해 로그인을 진행하는 것을 확인했습니다.


저기에 유저 정보를 넣어 로그인을 해봅시다. 크롤러가 로그인 정보를 갖기 위해서 세션을 사용합니다. 다음과 같이 코드를 수정합니다.


import requests
from bs4 import BeautifulSoup

class Crawler:
    def __init__(self):
        self.__login_url = 'https://src.smoh.kr/login'
        self.__seach_url = 'https://src.smoh.kr/projects/crawlerissues/issues'
        self.__login_data = {
            'username': 'jd_user',
            'password': 'P@ssword'
        }
        return

    def main(self):
        with requests.Session() as s:
            req = s.post(self.__login_url, self.__login_data)
            if req.status_code == 200:
                html = s.get(self.__seach_url)
                print(html)
            else:
                print('Failed to login(Code: %d)' %(req.status_code))
        return

crawler = Crawler()
crawler.main()


** 크롤링할 레드마인이 없으신 분은 저 계정을 사용하시면 됩니다만 사전 공지 없이 변경될 수 있음을 알려드립니다.


결과가 어떻게 나오나요? "Failed to login(Code: 422)"와 함께 로그인이 제대로 되지 않을 겁니다. 원인이 무엇인지 postman을 통해 직접 post 요청을 날리고 메시지를 확인해 봅시다.


"Invalid form authenticity token"라는 에러와 함께 로그인에 실패하네요. 혹시 위의 HTML Elements에서 authenticity token을 보셨나요? 


해당 값은 보안을 위해 발급된 토큰으로 매 로그인 시마다 다른 값을 요구합니다. 따라서 크롤러에서 이 값을 사용하기 위해 코드를 다음과 같이 수정합시다.


import requests
import datetime
from bs4 import BeautifulSoup

class Crawler:
    def __init__(self):
        self.__main_url = 'https://src.smoh.kr/'
        self.__login_url = 'https://src.smoh.kr/login'
        self.__search_url = 'https://src.smoh.kr/projects/crawlerissues/issues?set_filter=1'
        self.__login_data = {
            'username': 'jd_user',
            'password': 'P@ssword'
        }
        self.__issues = {}
        return

    def main(self):
        with requests.Session() as s:
            main_req = s.get(self.__main_url)
            html = main_req.text
            obj = BeautifulSoup(html, 'html.parser')
            auth_token = obj.find('input', {'name': 'authenticity_token'})['value']
            self.__login_data = {**self.__login_data, **{'authenticity_token': auth_token}}

            login_req = s.post(self.__login_url, self.__login_data)
            if login_req.status_code == 200:
                search_req = s.get(self.__search_url)
                search_obj = BeautifulSoup(search_req.text, 'html.parser')
                thead = search_obj.select('div.autoscroll > table > thead > tr > th')
                tbody = search_obj.select('div.autoscroll > table > tbody > tr > td')
                issue_obj = {}
                issue_list = []
                for i in range(1, len(tbody) +1):
                    if(i % len(thead) != 0):
                        issue_obj[thead[i % len(thead)].text] = tbody[i].text
                    else:
                        issue_list.append(issue_obj)
                        issue_obj = {}
                self.__issues = {
                    'execution_dttm': str(datetime.datetime.now().isoformat()),
                    'issues': issue_list
                }
            else:
                print('Failed to login(Code: %d)' %(req.status_code))
            print(self.__issues)
        return

crawler = Crawler()
crawler.main()


차근차근 코드를 살펴봅시다.


우선 url이 세 개로 늘었습니다. auto_token을 받아오는 메인 페이지, 로그인을 요청하는 페이지, 이슈를 조회하는 페이지가 있습니다. 로그인 시 사용하는 객체는 __login_data에 저장해 두었으며 __issues는 조회한 이슈를 정리하여 담아두기 위한 객체입니다.


실제 작업의 워크 플로우를 봅시다.


먼저 세션을 생성하고 세션 내에서 auth_token을 구해옵니다. 구해온 토큰은 __login_data에 저장해 두었습니다.


이제 로그인시 필요한 정보가 모두 모였으니 로그인을 시도합니다. status_code를 확인해 정상적으로 로그인이 되었다면 조회를 시작합니다. 


조회 결과를 search_req에 담아둔 뒤 BeautifulSoup를 이용해 객체로 변환합니다.


모든 HTML이 아닌 위에 보이는 테이블의 헤더와 row정보만 필요하므로 셀렉터를 사용해서 값을 추출해주었습니다.


추출한 값을 루프 문을 통해 각각의 이슈를 객체로 만든 뒤 리스트에 담아두었습니다. 모든 작업이 끝나면 시간과 함께 JSON으로 만들기 위해 __issues에 저장한 후 출력까지 해보았습니다.


값이 위와 같이 잘 나오시나요? 이로써 가장 간단하고 기초적인 크롤러를 만들어보았습니다. 다음에는 이 크롤러를 좀 더 발전시켜보도록 하겠습니다.


** 본 포스팅의 소스코드는 여기에서 확인할 수 있습니다.


반응형

0. 시작하기 앞서서


순수히 공부를위해, 서비스할 목적 없이 만들어진 서버 환경입니다.

따라서 방화벽과 SELinux는 모두 비활성화 된 상태입니다.

만약 문제가 발생할경우 설정을 확인해 주시기 바랍니다.


1. Apache 설치


[root@localhost smoh]# yum install httpd


2. pip 설치

[root@localhost smoh]# yum install epel-release
[root@localhost smoh]# yum install python-pip
[root@localhost smoh]# pip install --upgrade pip


3. Django 설치

[root@localhost smoh]# pip install django


4. mod_wsgi 설치

[root@localhost smoh]# yum install mod_wsgi


5. Django 프로젝트 생성


(프로젝트를 생성하고 싶은 경로로 이동.)

[root@localhost smoh]# django-admin startproject demo


6. Apache 설정


6.1. httpd.conf 설정파일 확인

[root@localhost smoh]# vi /etc/httpd/conf/httpd.conf

Supplemental configuration 항목이 IncludeOptional conf.g/*conf인지 확인.

6.2. 설정파일 생성 (이름은 원하는대로 설정.)

[root@localhost smoh]# vi /etc/httpd/conf.d/django.conf

(내용은 아래와 같이 생성)

<VirtualHost *:80>

        WSGIScriptAlias / /home/smoh/demo/demo/wsgi.py

        <Directory /home/smoh/demo/demo>

                <Files wsgi.py>

                       Order deny,allow

                       Allow from all

Require all granted

                </Files>

        </Directory>

</VirtualHost>


6.3. 권한설정

[smoh@localhost /]$ sudo chmod 711 /home/smoh


7. wsgi.py 파일 수정


[root@localhost demo]# vi /home/smoh/demo/demo/wsgi.py

import os, sys

path = '/home/smoh/demo'
if path not in sys.path:
    sys.path.append(path)

from django.core.wsgi import get_wsgi_application

os.environ.setdefault("DJANGO_SETTINGS_MODULE", "demo.settings")

application = get_wsgi_application()


8. Apache 재시작 및 자동시작 등록


[root@localhost demo]# systemctl restart httpd.service

[root@localhost demo]# chkconfig httpd on


반응형

장고의 URL 표현식.


0. 예시 - url의 표현

...

url(r'^areas/(?P<area>.+)/&', views.areas),

...


1. 첫번째 인자. - r'^areas/(?P<area>.+)/$'


Django에서 url의 첫 번째 인자는 보통 r'^.../...$'과 같은 형태를 가진다.

따옴표 안에 들어가는 내용은 정규표현식으로 나타낸다.

      • ^ : 문자열의 시작을 표시한다.
      • $ : 문자열의 끝을 표시한다.
      • areas : 현재문장에서의 문자그대로 areas라는 String.
      • .+ : 개행문자를 제외한 모든 문자를 의미한다.
      • (?<...>) : symbolic 그룹 이름. ...에 해당하는 그룹과 매칭되는 부분문자열에 접근이 가능함.

2. 두번째 인자. - views.areas

첫번째 인자에 해당되는 정규표현식과 매칭되는 주소를 요청받으면 views에 있는areas함수가 호출됨.


반응형

'Programming > Python' 카테고리의 다른 글

[Crawler] Python과 BS4를 이용한 크롤러 만들기 - 1  (0) 2020.01.21
[Django] CentOS7 환경에서의 Django 실행  (0) 2017.06.16
[Django] MVC 패턴  (0) 2017.06.07
[Django] Model  (0) 2017.06.07
[Python] print() 함수  (0) 2017.06.07

일반적인 MVC패턴에서 M, V, C는 각각 다음을 의미한다.

M : Model

V : View

C : Controller


Django도 MVC 패턴을 사용하며 M, V, C는 각각 다음을 가리킨다.

M : Model

데이터에 해당하며 프로젝트에서 models.py에 해당한다.

클래스의 형식대로 데이터를 DB에 저장, 불러온다.

V :View

보여지는 화면에 해당하며 프로젝트에서 templates에 해당한다.

화면에 어떤 장면을 보여줄지를 결정한다.

C : Controller

조율에 해당하며 프로젝트에서 views.py에 해당한다.

예시로 Model에서 데이터를 읽어 View에 보여주는 역할이 이에 해당된다.


1. 참고

Django에서는 controller를 views.py에서 담당하고 View를 templates에서 담당한다.


반응형

'Programming > Python' 카테고리의 다른 글

[Django] CentOS7 환경에서의 Django 실행  (0) 2017.06.16
[Django] url expressions  (0) 2017.06.07
[Django] Model  (0) 2017.06.07
[Python] print() 함수  (0) 2017.06.07
[Python] Data Structure - Tuple  (0) 2017.03.31

1. 개념

Django에서 Model은 데이터 서비스를 제공하는 Layer이다. 

Django의 Model은 각 Django App안에 기본적으로 생성되는 models.py 모듈 안에 정의하게 된다. 

각각의 Model은 django.db.models.Model 클래스의 서브클래스이다.

하나의 모델 클래스는 데이타베이스에서 하나의 테이블에 해당된다.

모델을 저장하면 DB에 저장된다.


2. 예시

..\model.py

class Person(models.Model):

    first_name = models.CharField(max_length=30)

    last_name = models.CharField(max_length=30)

위의 코드는 DB에서 다음과 같다.

CREATE TABLE myapp_person (

    "id" serial NOT NULL PRIMARY KEY,

    "first_name" varchar(30) NOT NULL,

    "last_name" varchar(30) NOT NULL

);


3. 참고

Django에서 보통 model이름은 대문자로 시작하고, 단수형으로 쓴다.


반응형

'Programming > Python' 카테고리의 다른 글

[Django] url expressions  (0) 2017.06.07
[Django] MVC 패턴  (0) 2017.06.07
[Python] print() 함수  (0) 2017.06.07
[Python] Data Structure - Tuple  (0) 2017.03.31
[Python] Data Structure - List  (0) 2017.03.31


1, 일반적인 사용법 - 기본 줄바꿈


for i in range(0, 3):

print(i);


결과 

0

1

2


2. print()의 끝문자를 변경하는 방법


for i in range(0, 3):

print(i, end=' ');


결과

0 1 2


for i int range (0, 3):

print(i, end='');


결과

012


print()의 end를 추가하여 print()가 끝날떄 삽입되는 문자를 변경할 수 있다. 


반응형

'Programming > Python' 카테고리의 다른 글

[Django] MVC 패턴  (0) 2017.06.07
[Django] Model  (0) 2017.06.07
[Python] Data Structure - Tuple  (0) 2017.03.31
[Python] Data Structure - List  (0) 2017.03.31
[Python] List - Negative index  (0) 2017.03.31

Practice Code

#Data Structure - Tuple

#Declare(Packing)

date = 'Year', 2017, 'Month', 3, 'day', 31;

print(date, "\n");


#Access

print(date[1]);

print(date[-2], "\n");


#Try to modify value

#The below sentence causes "tuple' object does not support item assignment" Error

#date[3] = 4;

#Tuple type is immutable.

#But, List could be modified

list_tuple = ([1, 2, 3], [4, 5, 6]);

print(list_tuple);

list_tuple[0][1] = 20;

print(list_tuple, "\n");


#Unpacking

a, b, c, d, e, f = date;

print(a, b, c, d, e, f)


#Type casting(Tuple <-> list)

list_date = list(date);

print(type(list_date), list_date);

new_date = tuple(list_date);

print(type(new_date), new_date);


Result

('Year', 2017, 'Month', 3, 'day', 31) 


2017

day 


([1, 2, 3], [4, 5, 6])

([1, 20, 3], [4, 5, 6]) 


Year 2017 Month 3 day 31

<class 'list'> ['Year', 2017, 'Month', 3, 'day', 31]

<class 'tuple'> ('Year', 2017, 'Month', 3, 'day', 31)


List and Tuple

튜플타입은 리스트보다 제공하는 메서드등의 기능이 적다.이러한 단순함은 성능상의 이점을 제공해준다.

따라서 데이터에 대한 변경이 필요로 하지않는다면 리스트보다 튜플을 사용한다면 더 나은 성능을 기대할 수 있다.

반응형

'Programming > Python' 카테고리의 다른 글

[Django] Model  (0) 2017.06.07
[Python] print() 함수  (0) 2017.06.07
[Python] Data Structure - List  (0) 2017.03.31
[Python] List - Negative index  (0) 2017.03.31
[Python] 따옴표 출력하기.  (0) 2017.03.31

Practice Code

#Data Structure - List

#Declare

list = [1, 3, 5, 7, 9]

print(list);

print("\n\n");


#Check length of list

print(len(list));

print("\n\n");


#Index of list

print(list[4]);

print("\n\n");


#Negative index of list

print(list[-1]);

print("\n\n");


#Add data

list.append(11);

print(list);

print("\n\n");


#Delete specific data

list.remove(5);

print(list);

print("\n\n");


#Delete specific position

list.pop(0);

print(list);

print("\n\n");


#Sublist

print(list[0:3]);

print(list[-2:]);

print("\n\n");


#CopyList

print("List Copy Example.");

ori_list = [1, 3, 5, 7]

new_list = ori_list;

new_list.append(9);


print("original list : ", ori_list);

print("new list : ", new_list);

cpy_list = ori_list[:];

cpy_list.append(11);

print("original list : ", ori_list);

print("cpy list : ", cpy_list);

print("\n\n");


#Concatenate list

listA = [1, 2, 3];

listB = [4, 5, 6];

listC = listA + listB;

print(listC);

print(id(listA), id(listB), id(listC));

print("\n\n");


#extend list

print(id(listA), listA);

listA.extend(listB);

print(id(listA), listA);

print("\n\n");


#del() function

print(listA);

del listA[0];

print(listA);

del listA[-2:];

print(listA);

del listA;


Result Screen

[1, 3, 5, 7, 9]


5


9


9


[1, 3, 5, 7, 9, 11]


[1, 3, 7, 9, 11]


[3, 7, 9, 11]


[3, 7, 9]

[9, 11]


List Copy Example.

original list :  [1, 3, 5, 7, 9]

new list :  [1, 3, 5, 7, 9]

original list :  [1, 3, 5, 7, 9]

cpy list :  [1, 3, 5, 7, 9, 11]


[1, 2, 3, 4, 5, 6]

56151576 56151416 56182264


56151576 [1, 2, 3]

56151576 [1, 2, 3, 4, 5, 6]


[1, 2, 3, 4, 5, 6]

[2, 3, 4, 5, 6]

[2, 3, 4]

반응형

'Programming > Python' 카테고리의 다른 글

[Python] print() 함수  (0) 2017.06.07
[Python] Data Structure - Tuple  (0) 2017.03.31
[Python] List - Negative index  (0) 2017.03.31
[Python] 따옴표 출력하기.  (0) 2017.03.31
[Python] NULL  (0) 2017.03.31

+ Recent posts