ASP.Net Core 3.0 MVC 프로젝트에서 Material Design Compoent를 사용하는 방법에 대해 알아봅니다.
기본적인 솔루션 및 패키지 구성은 이 글을 참고해 주세요.
1. package.json 수정
Material degisn을 사용하기 위해 NPM에서 "material-components-web"을 설치해야 합니다.
pakckage.json의 내용을 다음과 같이 변경합니다.
{
  "version": "1.0.0",
  "name": "asp.net",
  "private": true,
  "devDependencies": {
    "gulp": "4.0.2",
    "del": "5.1.0",
    "material-components-web": "4.0.0"
  }
}
이후 package.json 파일을 우클릭 후 패키지 복원을 클릭해 주세요.
2. css 생성
MDC을 사용할 CSS파일을 만듭니다.
"Styles"폴더를 생성하고 그 안에 "Home.css"파일을 생성한 후 다음과 같이 코딩합니다.
@import "../node_modules/material-components-web/dist/material-components-web.css";
body {
    margin: 0px;
}
3. gulpfile.js 수정
설치한 MDCWeb 패키지와 생성한 CSS파일을 빌드시 wwwroot 폴더로 복사해주는 코드를 작성합니다.
gulp.file.js를 다음과 같이 수정합니다.
/// <binding AfterBuild='default' Clean='clean' />
var gulp = require('gulp');
var del = require('del');
var paths = {
    scripts: ['scripts/**/*.js'],
    styles: ['styles/**/*'],
    MDCWeb: ['./node_modules/material-components-web/**/*'],
};
gulp.task('clean', function () {
    return del(['wwwroot/scripts/**/*', 'wwwroot/node_modules/**/*']);
});
gulp.task('default', function () {
    gulp.src(paths.scripts).pipe(gulp.dest('wwwroot/scripts'));
    gulp.src(paths.styles).pipe(gulp.dest('wwwroot/styles'));
    gulp.src(paths.MDCWeb).pipe(gulp.dest('wwwroot/node_modules/material-components-web'));
});
4. 페이지 수정.
예시에서는 기본 페이지를 사용합니다.
index.cshtml을 다음과 같이 수정합니다.
@{
    Layout = null;
}

<!DOCTYPE html>
<html>
<head>
    <meta name="viewport" content="width=device-width" />
    <link rel="stylesheet" href="https://fonts.googleapis.com/icon?family=Material+Icons">
    <link rel="stylesheet" href="~/styles/home.css">
    <title>Index</title>
</head>
<body>
    <header class=" mdc-top-app-bar">
        <div class="mdc-top-app-bar__row">
            <section class="mdc-top-app-bar__section mdc-top-app-bar__section--align-start">
                <button class="mdc-icon-button material-icons mdc-top-app-bar__navigation-icon--unbounded">menu</button><span class="mdc-top-app-bar__title">San Francisco, CA</span>
            </section>
            <section class="mdc-top-app-bar__section mdc-top-app-bar__section--align-end">
                <button class="mdc-icon-button material-icons mdc-top-app-bar__action-item--unbounded" aria-label="Download">file_download</button>
                <button class="mdc-icon-button material-icons mdc-top-app-bar__action-item--unbounded" aria-label="Print this page">print</button>
                <button class="mdc-icon-button material-icons mdc-top-app-bar__action-item--unbounded" aria-label="Bookmark this page">bookmark</button>
            </section>
        </div>
    </header>
    <script src="~/scripts/home.js"></script>
</body>
</html>
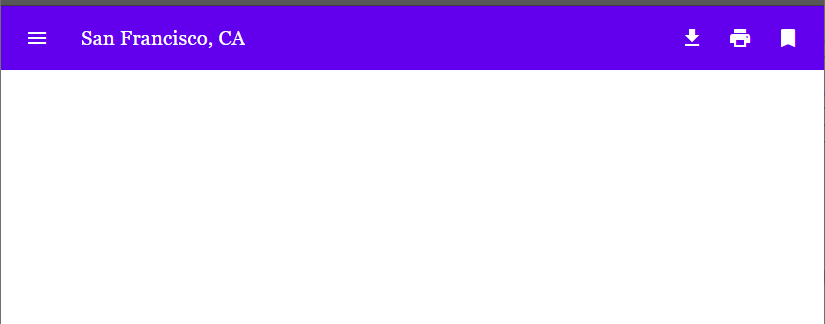
5. 빌드
이제 빌드 후 실행해봅시다.
다음과 같은 화면을 확인할 수 있습니다.
반응형
'Programming > C#' 카테고리의 다른 글
| [.Net5.0] 컴퓨터에 Framework 어셈블리가 없습니다. (1) | 2021.01.29 |
|---|---|
| [.Net Core] 오브젝트 스토리지에서 파일 관리하기 - 조회, 업로드 (0) | 2020.10.23 |
| ASP.NET Core에서 TypeScript사용하기 (0) | 2019.10.28 |
| [C#] string to int null및 0 확인 (0) | 2018.12.10 |
| [C#] List<T> 정렬 (0) | 2018.10.24 |